Thursday 29 July 2010

1940s/1950s Glamour

1940s/1950s Glamour
 
Photography: Ian,
Hair and Accessories: Styled by Lawrence at Toni and Guy, Marylebone High Street, London (http://www.ToniAndGuy.com),
Model: Sarah-Jane.

 (Featured in Iefimerida newspaper) (http://Iefimerida.gr),
Photography: Nikos Vasilakis (http://www.NikosAlpha.com),
Hair: Styled by Nell Nabarro and myself,
Clothes: Model's own,
Model: Nell Nabarro (http://www.facebook.com/NellNabarro)
at MOT (http://www.MOTModel.com).


 Photography: Phil Antony (http://www.PhilAntonyPhotography.co.uk),
Hair: Sal,
Model: Nicki Yahara (http://www.ModelMayhem.com/413968).


 Photography: Steve Brown,
Hair: Styled myself,
Accessories: Model's own,
Model: Helen at Target (http://www.TargetModels.com).

Here are the instructions for how to create a glamorous 1940s/1950s movie star look:-

Start with a freshly cleansed and moisturised face.

Apply foundation, concealer and powder (as instructed in a blog I posted further down this page called "Getting Flawless Skin").

Apply eyebrow pencil to the eyebrows using light feathery strokes for a natural-looking effect, and then brush the eyebrows in an upwards and outwards direction using an eyebrow brush.

Apply some loose powder under the eyes and on the tops of the cheeks using a fan brush before doing the eye make-up, (so that any fallen bits of eyeshadow land on the powder and don't mark the skin below the eyes).

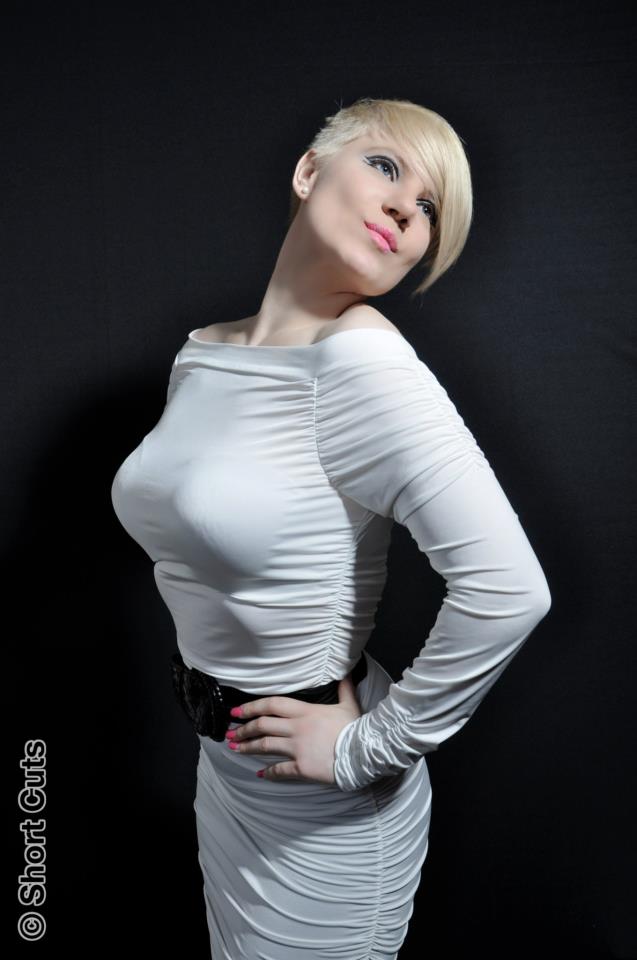
Next take a small eyeshadow brush, and brush it over a brightly coloured eyeshadow such as bright blue, bright yellow, bright purple, or bright green.  Then apply the eyeshadow just over the entire upper eyelids, up as far as the socket lines.

Alternatively take a large eyeshadow brush, and brush it over a white eyeshadow.  Then apply the white eyeshadow to the entire area from the upper lash lines right up to the eyebrows.  Then take a small eyeshadow brush, brush it over a brown or grey eyeshadow, and then apply it to contour the socket lines of the upper eyelids, just above the upper eyelids (as shown in the last photo above).  Then blend the brown or grey eyeshadow up into the white eyeshadow above it very slightly using an eyeshadow blending brush, so soften the effect of it, and so there aren't any hard edges (as shown in the last photo above).

After you've applied the eyeshadow, brush the powder away from under the eyes using a powder brush.

Now take a black liquid eyeliner (or otherwise an eyeliner brush which has been dipped into water and then brushed over black eyeshadow), and use it to draw a clean black line along the upper lash lines starting from the inner corners of the upper lash lines and extending right to the outer corners of the upper lash lines.  Then extend the line past the outer corners of the upper lash lines, drawing straight lines past the outer corners of the eyes, which slant upwards at a 45 degree angle, like flicks (as shown in the photos above).  Make the ends of the flick lines taper to sharp points.

Apply a couple of coats of black mascara to top and bottom eyelashes, and then comb through them with an eyelash comb.

Alternatively keep the eyelids nude, and just apply mascara.

Outline the lips with a bright red lip liner pencil, and then paint the lips with a bright red lipstick, and apply lip gloss on top if you like.

And that's how to create 1940s/1950s movie star glamour!

Be sure to check back for more make-up instructions and tips!

1960s Retro Eyes

1960s Retro Eyes

Photography: Stephen Norris (http://www.facebook.com/stephen.norris.1213),
Hair: Cut, coloured and styled by Chris Evans (http://www.facebook.com/chrisee1) at Short Cuts (http://www.ShortCutsHair.co.uk),
Model: Chloe.

Photography: Stephen Norris (http://www.facebook.com/stephen.norris.1213),
Hair: Cut, coloured and styled by Chris Evans (http://www.facebook.com/chrisee1) at Short Cuts (http://www.ShortCutsHair.co.uk),
Model: Sam.

Photography: Alan Harbord (http://www.facebook.com/alan.harbord.photography),
Hair: Styled myself
Clothes/Accessories: Model's own
Model: Lucie.

Photography: Cristian Bogdan (http://www.Bogdan.co.uk),
Hair: Styled by Antonio Giovanni and Jerome Hillion
Model: Melissa at Storm (http://www.StormModels.com).

Photography: Stephen Norris (http://www.facebook.com/stephen.norris.1213),
Hair: Cut, coloured and styled by Chris Evans (http://www.facebook.com/chrisee1) at Short Cuts (http://www.ShortCutsHair.co.uk),
Clothes: Model's own,
Model: Tatjana.

Photography: Stephen Norris (http://www.facebook.com/stephen.norris.1213),
Hair: Cut, coloured and styled by Chris Evans (http://www.facebook.com/chrisee1) at Short Cuts (http://www.ShortCutsHair.co.uk),
Clothes/Accessories: Model's own,
Model: Riki.

Here are the instructions for how to create 1960s-style eye make-up:-

Start with a freshly cleansed and moisturised face.  

Apply foundation, under-eye concealer, and powder, over the face and eyelids (as in the blog below called "Getting Flawless Skin").

Using a large eyeshadow brush apply a white/pinkish white/bluish white/ivory/cream eyeshadow over the entire area from the upper lash lines up to the eyebrows, so that the upper eyelids and brow bones are covered with it.

Define the eyebrows with eyebrow pencil, and then brush the eyebrows in an upwards and outwards direction with an eyebrow brush.  Then fix the eyebrows in place if necessary either with a clear brow gel or by using an eyebrow brush which has been sprayed with hairspray directly before you use it.

Take a thin-tipped eyeliner brush, dip it into water, and then while it's wet, brush it over a black/dark grey/dark brown/dark navy or another dark coloured eyeshadow.  Draw a fine line with this dark eyeshadow parallel to but just higher than the socket lines above the upper eyelids.  (With oriental eyelids where the eyelids are not quite as defined, as they are more shallow set, you sometimes have to judge where to draw the lines.  They should be just slightly higher than where the upper edge of the eyeballs bulge through the upper eyelids).

Then line the upper lash lines with the same dark eyeshadow applied wet with a thin-tipped eyeliner brush, and extend the lines beyond the outer corners of the eyes (as shown in the last three photos above).  Then draw lines starting from the outer thirds of the lower eyelids, and extending past the outer corners of the eyes, below but parallel to the lines extending out from the upper eyelids, leaving a space of a few millimetres between the two lines extending out beyond the outer corners of the eyes (as shown in the last three photos above).

Next dip an eyeliner brush or a thin-tipped eyeshadow brush into water, and brush it over a white eyeshadow.  Apply the white eyeshadow between the two parallel dark lines that extend beyond the outer corners of the eyes.

Now take another thin-tipped eyeliner brush and dip it into water, and brush it over a bright blue/bright pink/bright purple/bright orange/bright green/bright plum coloured eyeshadow, and then draw a line with it parallel to but above the line you drew before above the socket lines with the dark coloured eyeshadow, (as shown in the fourth and sixth photos above).

Apply a couple of coats of black mascara to top and bottom eyelashes, and then comb through them with an eyelash comb, and add some false eyelashes if you like.

Finally you can draw some eyelashes onto your lower eyelids if you like, (as shown in the first four photos above), using a thin-tipped eyeliner brush which has been dipped into water and brushed over a black eyeshadow.

This eye make-up works best with pale pink/pale beige/pale nude coloured lips.

Enjoy fluttering your eyelashes with this look!

Wednesday 28 July 2010

Getting Flawless Skin

Getting Flawless Skin
Photography: Keven Erickson (http://www.Erickson-Photo.com),
Hair and Clothes: Styled myself,
Model: Paris at M & P (http://www.MAndPModels.com).

Photography: Ian,
Hair: Styled by Lawrence at Toni and Guy, Marylebone High Street, London (http://www.ToniAndGuy.co.uk),
Model: Sarah-Jane.

Here are the step-by-step instructions for how to create flawless skin as shown in the photos above:-

Firstly cleanse and moisturise the face.  

If there are any red patches on the face, apply green colour corrector to these areas to tone the redness down.  Apply the green colour corrector using a concealer brush, and then pat or blend it in using your fingers.  

Select a foundation the same colour as the skin on the face.  (To find the right colour foundation, apply a bit of foundation to the model’s jawline.  The one which is the right colour will disappear into the model’s skin).  Apply the foundation in small dots to various areas of the face (i.e. the forehead, the nose, the cheeks, and the chin). (It needs to be applied quite sparingly in order to give a natural effect).  Next blend the foundation in using either your fingers or a cosmetic sponge.  Be sure to blend the foundation right up to the hairline and under the jawline, to create a seamless finish, so that there aren’t any areas of the face that are left uncovered, and so that there aren’t any lines where the foundation ends. 

Apply concealer the same colour as the foundation to any acne spots, rashes, coloured scars, pigmentation marks, spider veins/capillaries, birthmarks, or other marks, using a concealer brush.  Then pat the concealer gently with a finger to blend it in, to create a seamless finish.  

Apply concealer one shade lighter than the skin to dark under-eye circles, to lighten up the dark under-eye area, and to make it look less tired.  First apply it using an under-eye concealer brush, and then pat it lightly with your ring finger to blend it in.  (It needs to be applied quite heavily in order to eliminate a tired appearance).  Be sure to apply the under-eye concealer over the inner corners of the eyes, (as well as over the under-eye area), as dark circles start from the inner corners of the eyes.  

Select a loose powder the same colour as the foundation.  Or for a porcelain effect select a white powder.  (Note that you can only create a porcelain effect on fair skin, it won’t work on dark skin, as it will just make dark skin look ill and ashy).  Fix the under-eye concealer in place by applying the loose powder over the top of it.  Use a finger to blend the under-eye concealer out of any wrinkles or creases around the eyes before applying the loose powder on top.  Apply the loose powder around the eyes using a large eyeshadow brush, in order to cover the small areas with precision that you cannot easily cover with a powder puff.  Then apply loose powder all over the rest of the face using a powder puff.  Make sure you get an even coverage.  (This fixes the foundation and concealer in place, and mattifies the skin).  Then brush the excess powder off of the face using a powder brush, using downward strokes, so that the tiny hairs on the face lie flat.

Oily or combination skins need powder to eliminate the shiny appearance to their faces.  Even after applying powder their faces can become shiny again, and so need re-powdering in order to look more matte.  Particularly dry or eczemary skins are sometimes best without powder, as it can dry the skin out further.  

If you want to add a flush of colour to the cheeks, apply blusher to the apples of the cheeks.  (Note that fair skins suit baby pinks or light rosy pinks, olive skins suit warm pinks or pinky-bronzes, and dark skins suit deep pinks, deep plums, or deep burgundies).  

If you want to create a sun-kissed effect on fair or olive skin, or you want to make it look less pale, apply bronzing powder over the areas of the face where the sun would naturally hit, (i.e. the forehead, the nose, and the tops of the cheeks), using a powder brush or bronzer brush.  Be sure to only use a light coloured bronzing powder on fair skin, as a dark bronzing powder will be too dark for fair skin and will just look dirty on fair skin.  Olive skin can take deep bronzing powder though.  However on very fair or porcelain skin stick to a light rosy pink or baby pink blusher instead of bronzing powder, in order to create an English Rose effect.  

If you want to create a dewy effect, spray a fine mist from a water vaporizer over the face.  Hold the water vaporizer at arm’s length when spraying it, so that the water droplets that land on the face aren’t too big and don’t make the face look wet or sweaty, and don’t cause the make-up to run or become uneven.  This last step is a good idea for dry skins or over-heated skins in hot weather.

Et voila!  Check back again for more instructions for how to create different looks with make-up!